
Displaying Your Custom Fields
This article explains how to modify the information DayBack displays about your events on the calendar and within the Event Popover. It assumes you have already told DayBack about your fields, by first mapping your objects, tables, and fields within DayBack's configuration. If you've not mapped your fields, please refer to the relevant article for your platform, as field mapping is a necessary step before customizing how DayBack displays your fields.
Mapping Your Fields
Field mapping requirements vary by platform. For Google, Office 365, or Basecamp calendars, no additional mapping is needed, as DayBack is pre-configured to display these calendar types. However, field mapping is required for Salesforce and FileMaker; be sure to read the corresponding articles first:
Displaying Your Fields
Overview
How Can I Show My Own Fields on the Calendar?
You can display fields from your own tables and objects in two key areas: the main calendar views (Day, Week, Month) and the Event Popover (which appears when you click an event). Both displays are configured by adjusting the field mapping for each of your calendar sources in DayBack.
Formatting the Event's Title
DayBack distinguishes between the "title" and the "editable title" of your object's fields:
- Editable Title: This maps to a single field, such as the "Subject" of a case or the "Name" of a task.
- Title: This can include multiple fields, separated by commas. For example, you might start with the Task Name and then include the contact's phone number or other relevant details you want to see before clicking the event.

| ) character, as seen in the screenshot above. You can change this separator by editing the "Return character substitution" value in Admin Settings > Event Styles.
Fields in the Event's Popover
When you click on an event in the calendar, the fields displayed are determined by the fields you've mapped in Settings > Calendar Sources.
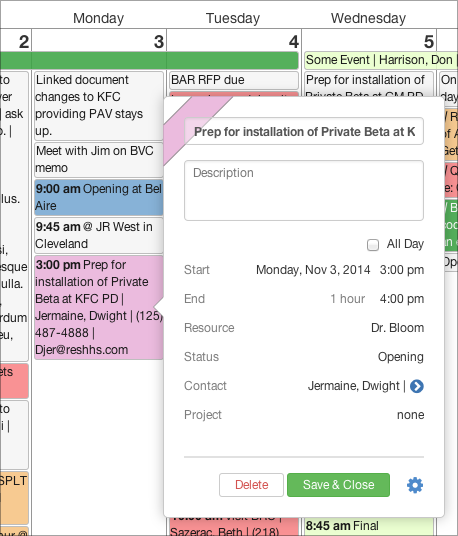
Each field includes specific configuration notes accessible by clicking "Details..." link under the field name. Here are a couple of fields that deserve special attention:
- Status: This field is used by DayBack to color-code your events. It doesn't have to represent a "status" specifically; it could be a division within your company or a business process. You can change the label "Status" in the calendar's display by editing DayBack's translation settings to rename it to something else.
- Resource: This field becomes a column in the calendar's "Resource" view. Resources could be salespeople, trucks, rooms, or barbershop chairs. This view is powerful for organizing and understanding a dense calendar. Learn more about resources here.
Adding More Fields
You can include as many additional fields as you need in a drawer beside the item detail popover by configuring "Custom Fields" when setting up your sources. Learn more about setting up custom fields.
Salesforce Specific
If you're using the default Events, Tasks, and Campaigns objects as your calendar sources, which are automatically mapped by DayBack, you might not be familiar with field mapping. Before proceeding, take a moment to review how field mapping works. Below, we will discuss how to refine an item's display using field mapping. Learn more about field mapping.
Using Custom Fields
You can include custom fields when defining your calendar sources. Remember that Salesforce appends a suffix to custom fields. For example, a custom field named "Sample" will appear as "Sample__c " in Salesforce.
You can also include related item names, such as a lead or contact (typically as Who.Name ) and related items like a campaign or opportunity (typically as What.Name ). For more information on setting up these related contain and project objects, see related who and what.
Use Your Own Salesforce Layouts
If you have too many fields to display in the DayBack popover, you can access more fields using your own Salesforce layouts. One method is to create a custom action (a button) that navigates to the record in its layout. DayBack includes a "Go to Event" button in the Events source. You can copy & paste the button code from the Events configuration section for use in any other object you've mapped within DayBack.
If you're in Lightning Experience, you can create a different button that will bring up the event's layout without you having to leave the calendar:

These "modal edit boxes" allow you to view more fields than typically displayed in the calendar. You open modals by clicking a button or set up DayBack to display them automatically when you click an event.
For a video demonstration and step-by-step instructions on implementing this in your organization, see Add Your Own Fields to the Calendar: Using Lightning Modal Boxes in Salesforce
FileMaker Specific
Calculated Fields in the Event Title
You can include multiple fields in the event title, as well as any additional fields you need. However, keep in mind that the deeper DayBack accesses your FileMaker relationships, the slower the calendar will be at retrieving data from FileMaker Server. Using fields solely from your events table will result in faster performance. Including related fields (such as a contact's phone number) will cause a slight slowdown, but these fields are often essential. Be cautious with summary fields or summary calculations, as they can significantly slow down performance.
Using Your Own FileMaker Layouts to Edit Events
If you have many event fields, like in small medical practices, you might prefer using your own FileMaker layout instead of DayBack's event popover. Since DayBack operates in a browser, it cannot directly use a FileMaker layout. However, you can create custom actions that open an event in FileMaker Pro, Go, or WebDirect, depending on the URL you provide. Learn more here: Custom Actions.