
Connecting DayBack to Supabase
Point DayBack at your Supabase table(s) by following the steps here in order.
Once you map the required fields in step 5, you'll be able to see your schedule in DayBack. You can then return here to polish your setup and add the icons and buttons that will let you understand your schedule at a glance.
Steps In this article
- 1. Turning on the Supabase Source
- 2. Signing into Supabase: Authorizing
- 3. Creating a New Calendar
- 4. Calendar Info
- 5. Field Mapping
- Going Further...
- Adding More Fields (Custom Fields)
- Actions & Buttons
Turn on the Supabase Source
Navigate to admin settings and turn on Supabase in the list of "Calendar Sources." You'll see a button to authorize your connection by signing into Supabase.
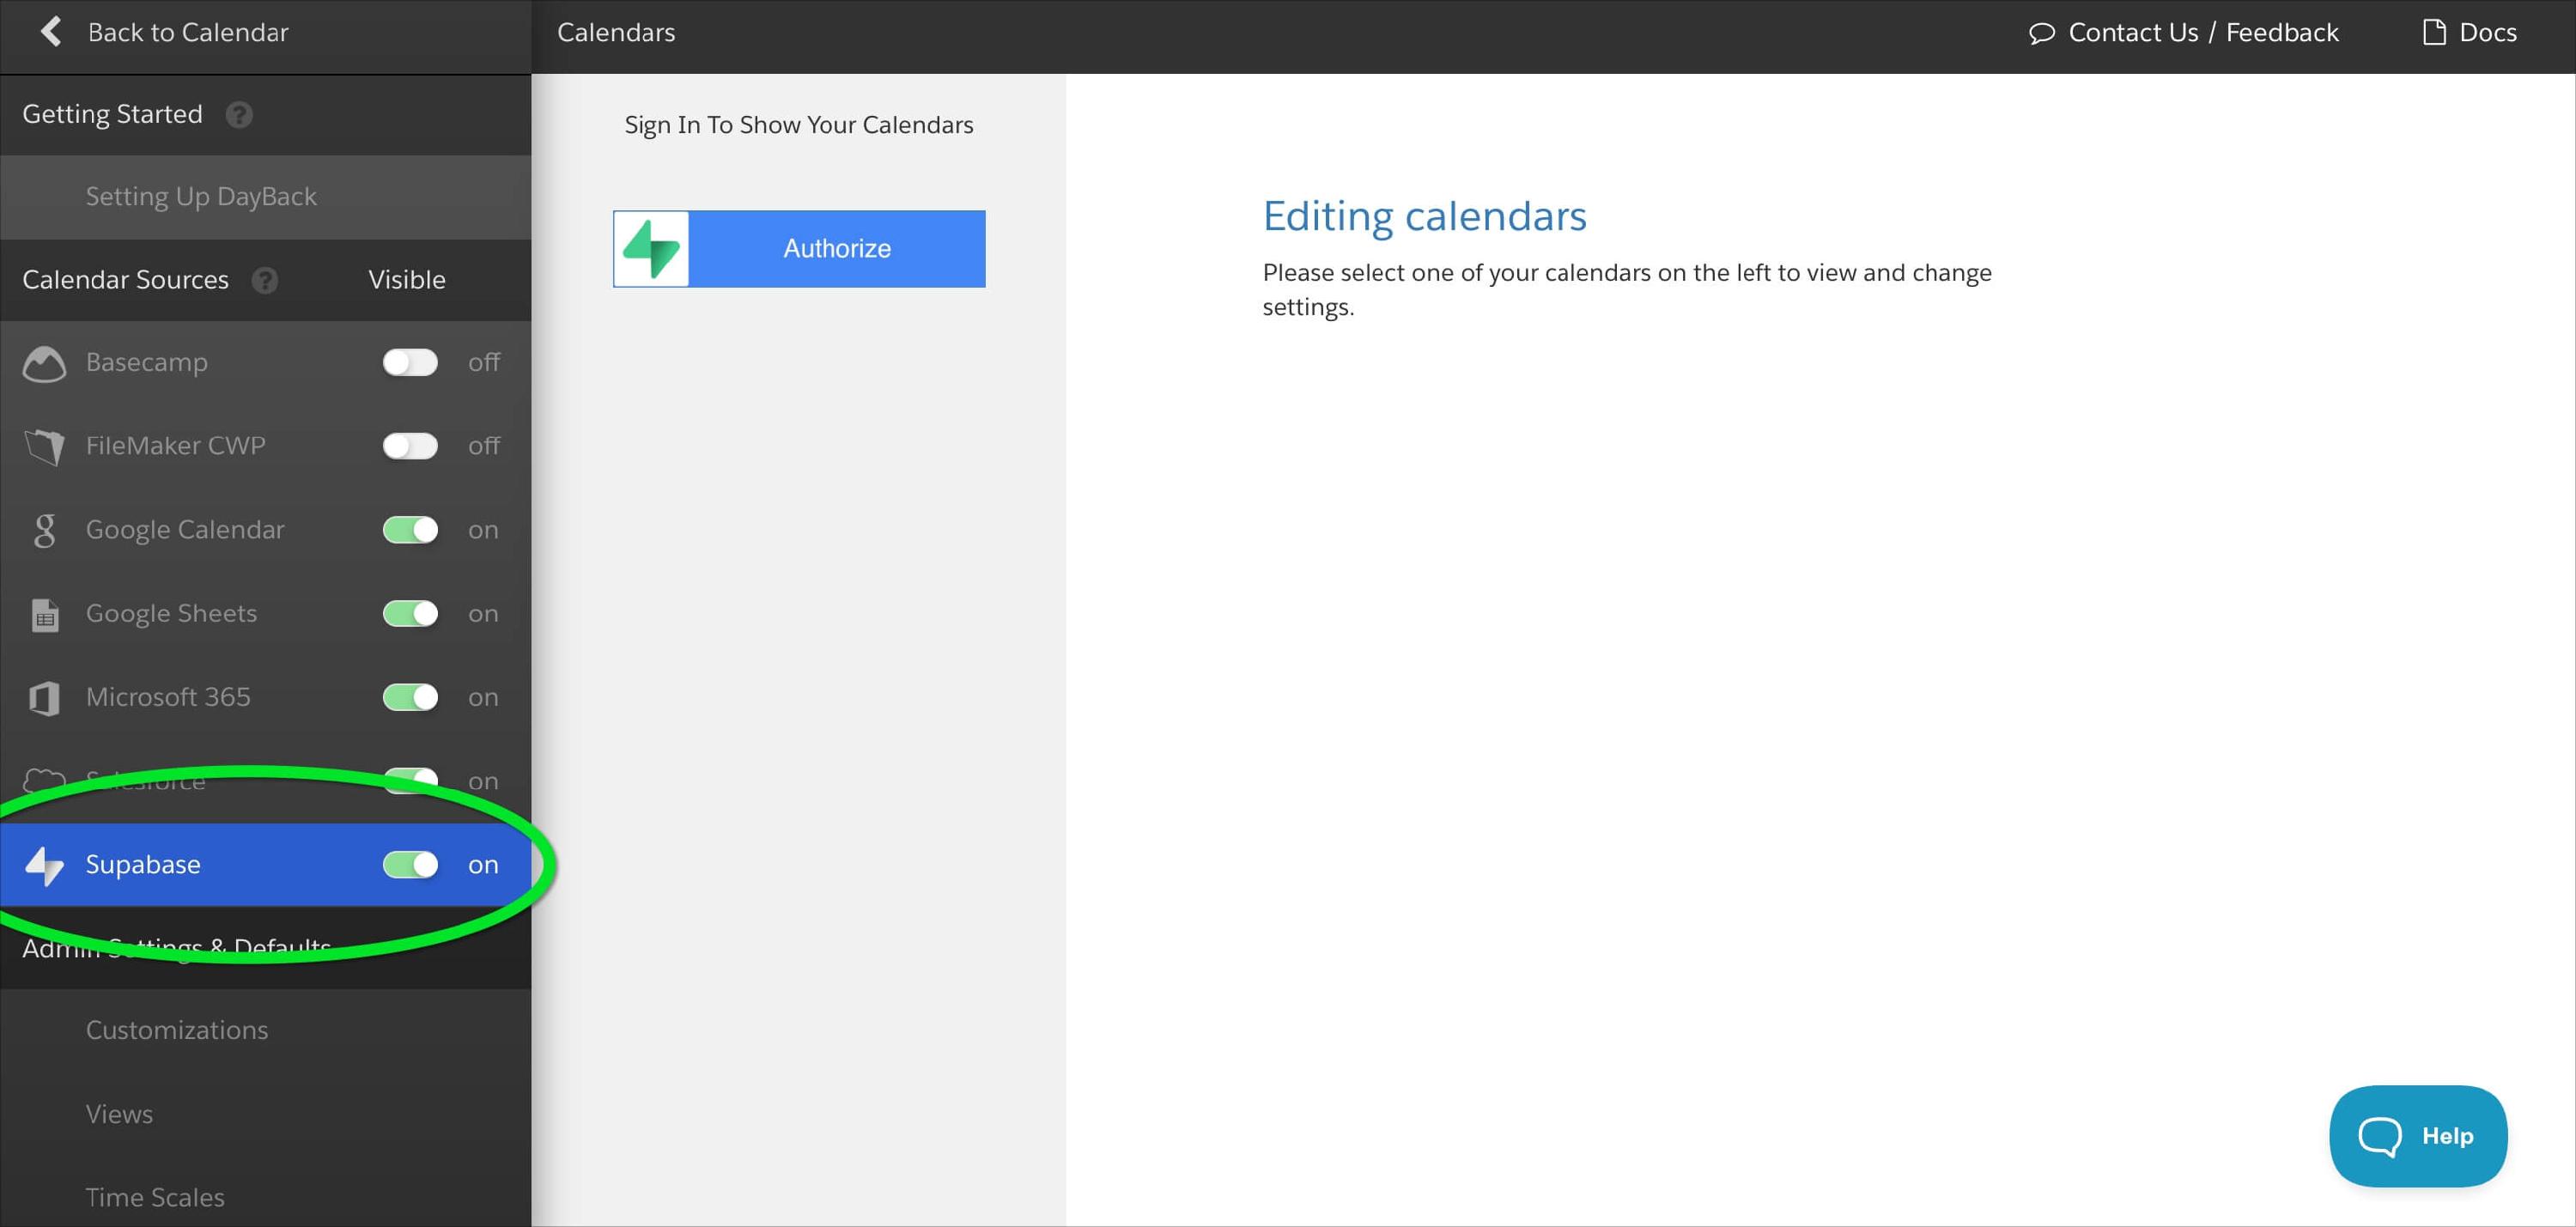
Authorize
Click "Authorize" and sign into your Supabase account.
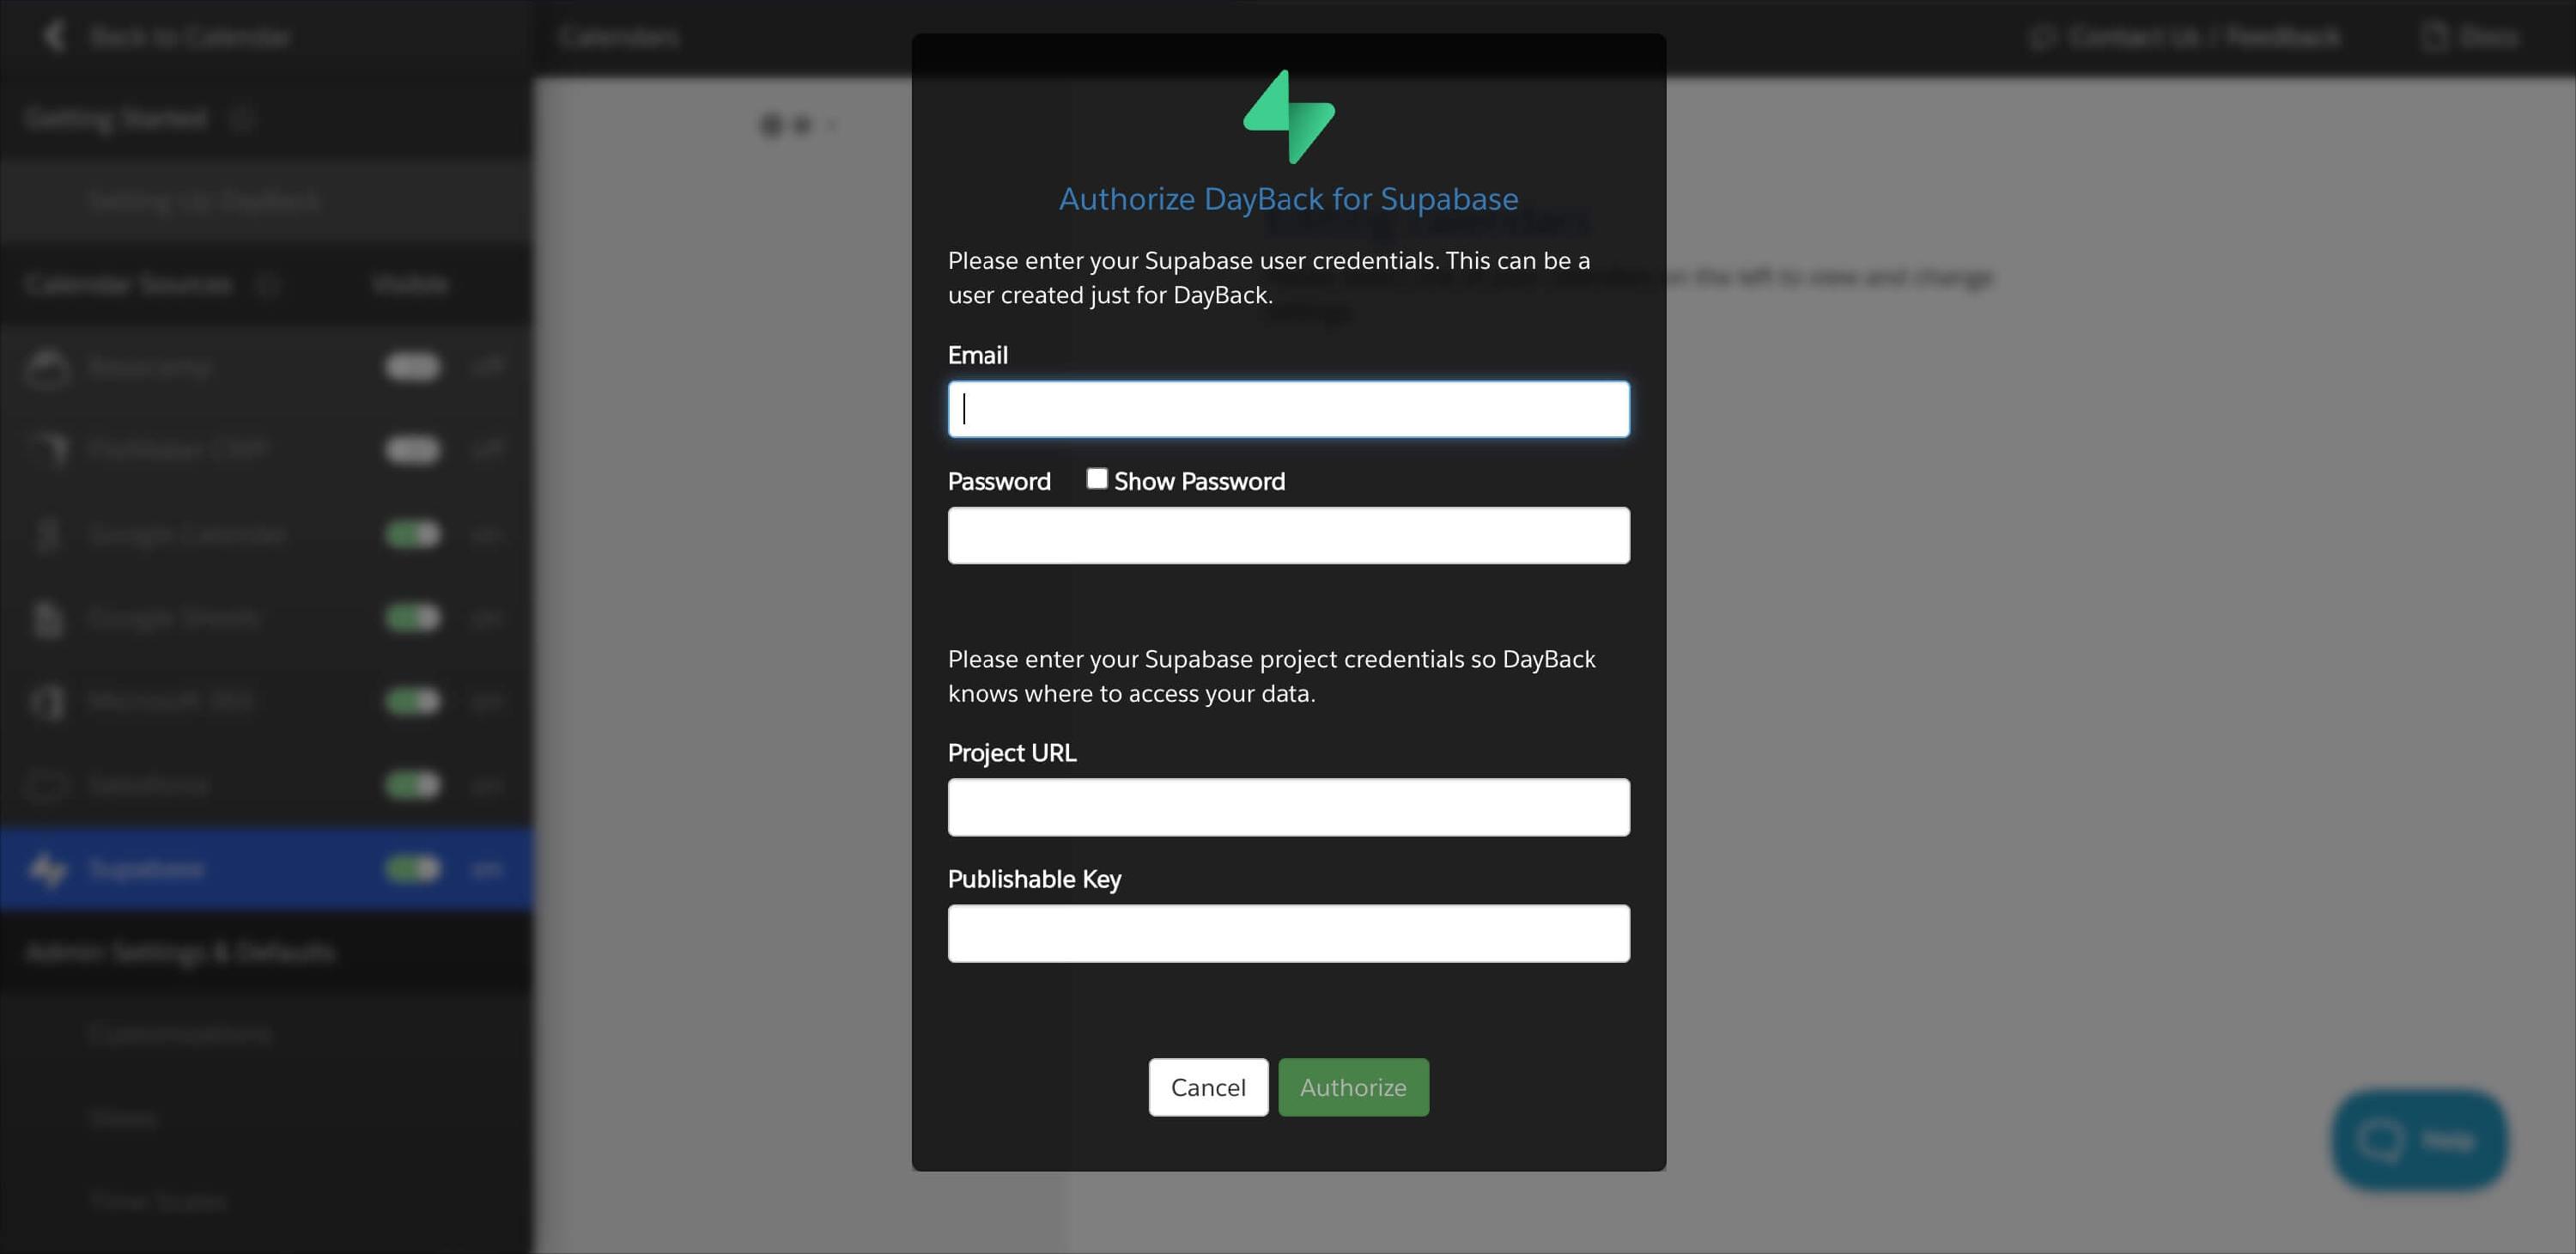
- Email and Password: This can be any user your Supabase instance but should have access to the tables you'd like to see in your calendar. This is not the username and password for your project as a whole: this is a user's credentials. If you're just getting started with Supabase...
- If you haven’t created a project yet, click “New Project” otherwise navigate to your project.
- In the sidebar click “Authentication.”
- You will want to add a user if you don’t have one already so click “Users” and then “Add User.”
- This will be the user you will use to authorize DayBack to access your Supabase data. So this can be a user specific to DayBack or an existing user that you already use.
- Project URL: This is your project URL and can be seen on the "Project Overview" screen in Supabase just below your project name. Make sure you navigate to "Project Settings" then "Data API" to confirm that "Enable Data API" is set to "on." You can see your project URL there also, but we don't want the "/rest/v1/" part of the URL.
- Publishable Key: You'll likely want to make a key specific to DayBack so that you can revoke or rotate it without affecting other services. In the sidebar click the cog icon for “Project Settings," then click “Api Keys." Then click “New publishable key” to create a new API key. Give it a label like “DayBack."
Create a New Calendar
This is where you'll define the basic setup of your first calendar. You'll likely have multiple calendars in your project—one for appointments, another for PTO requests and holiday, and maybe one for your resource's availability. Any table in your project that has date fields in it can be manipulated in DayBack as a calendar. You'll complete this and the following steps for each one.
If you don't yet have a table of events or appointments, or would like to add a new one to your Supabase project, DayBack makes this very easy. You can create a new table here: Adding DayBack's ideal appointments table to your Supabase project.
In this example, we're going to assume your table contains appointments and that your resources are people (team members and likely users or your app).
Calendar Info
Select the "New Supabase Calendar" if one has been created for you, or click "Add New Calendar" in the second column from the left. Give your calendar a name: this is the name your users will see, it's not the name of your table: that comes next.
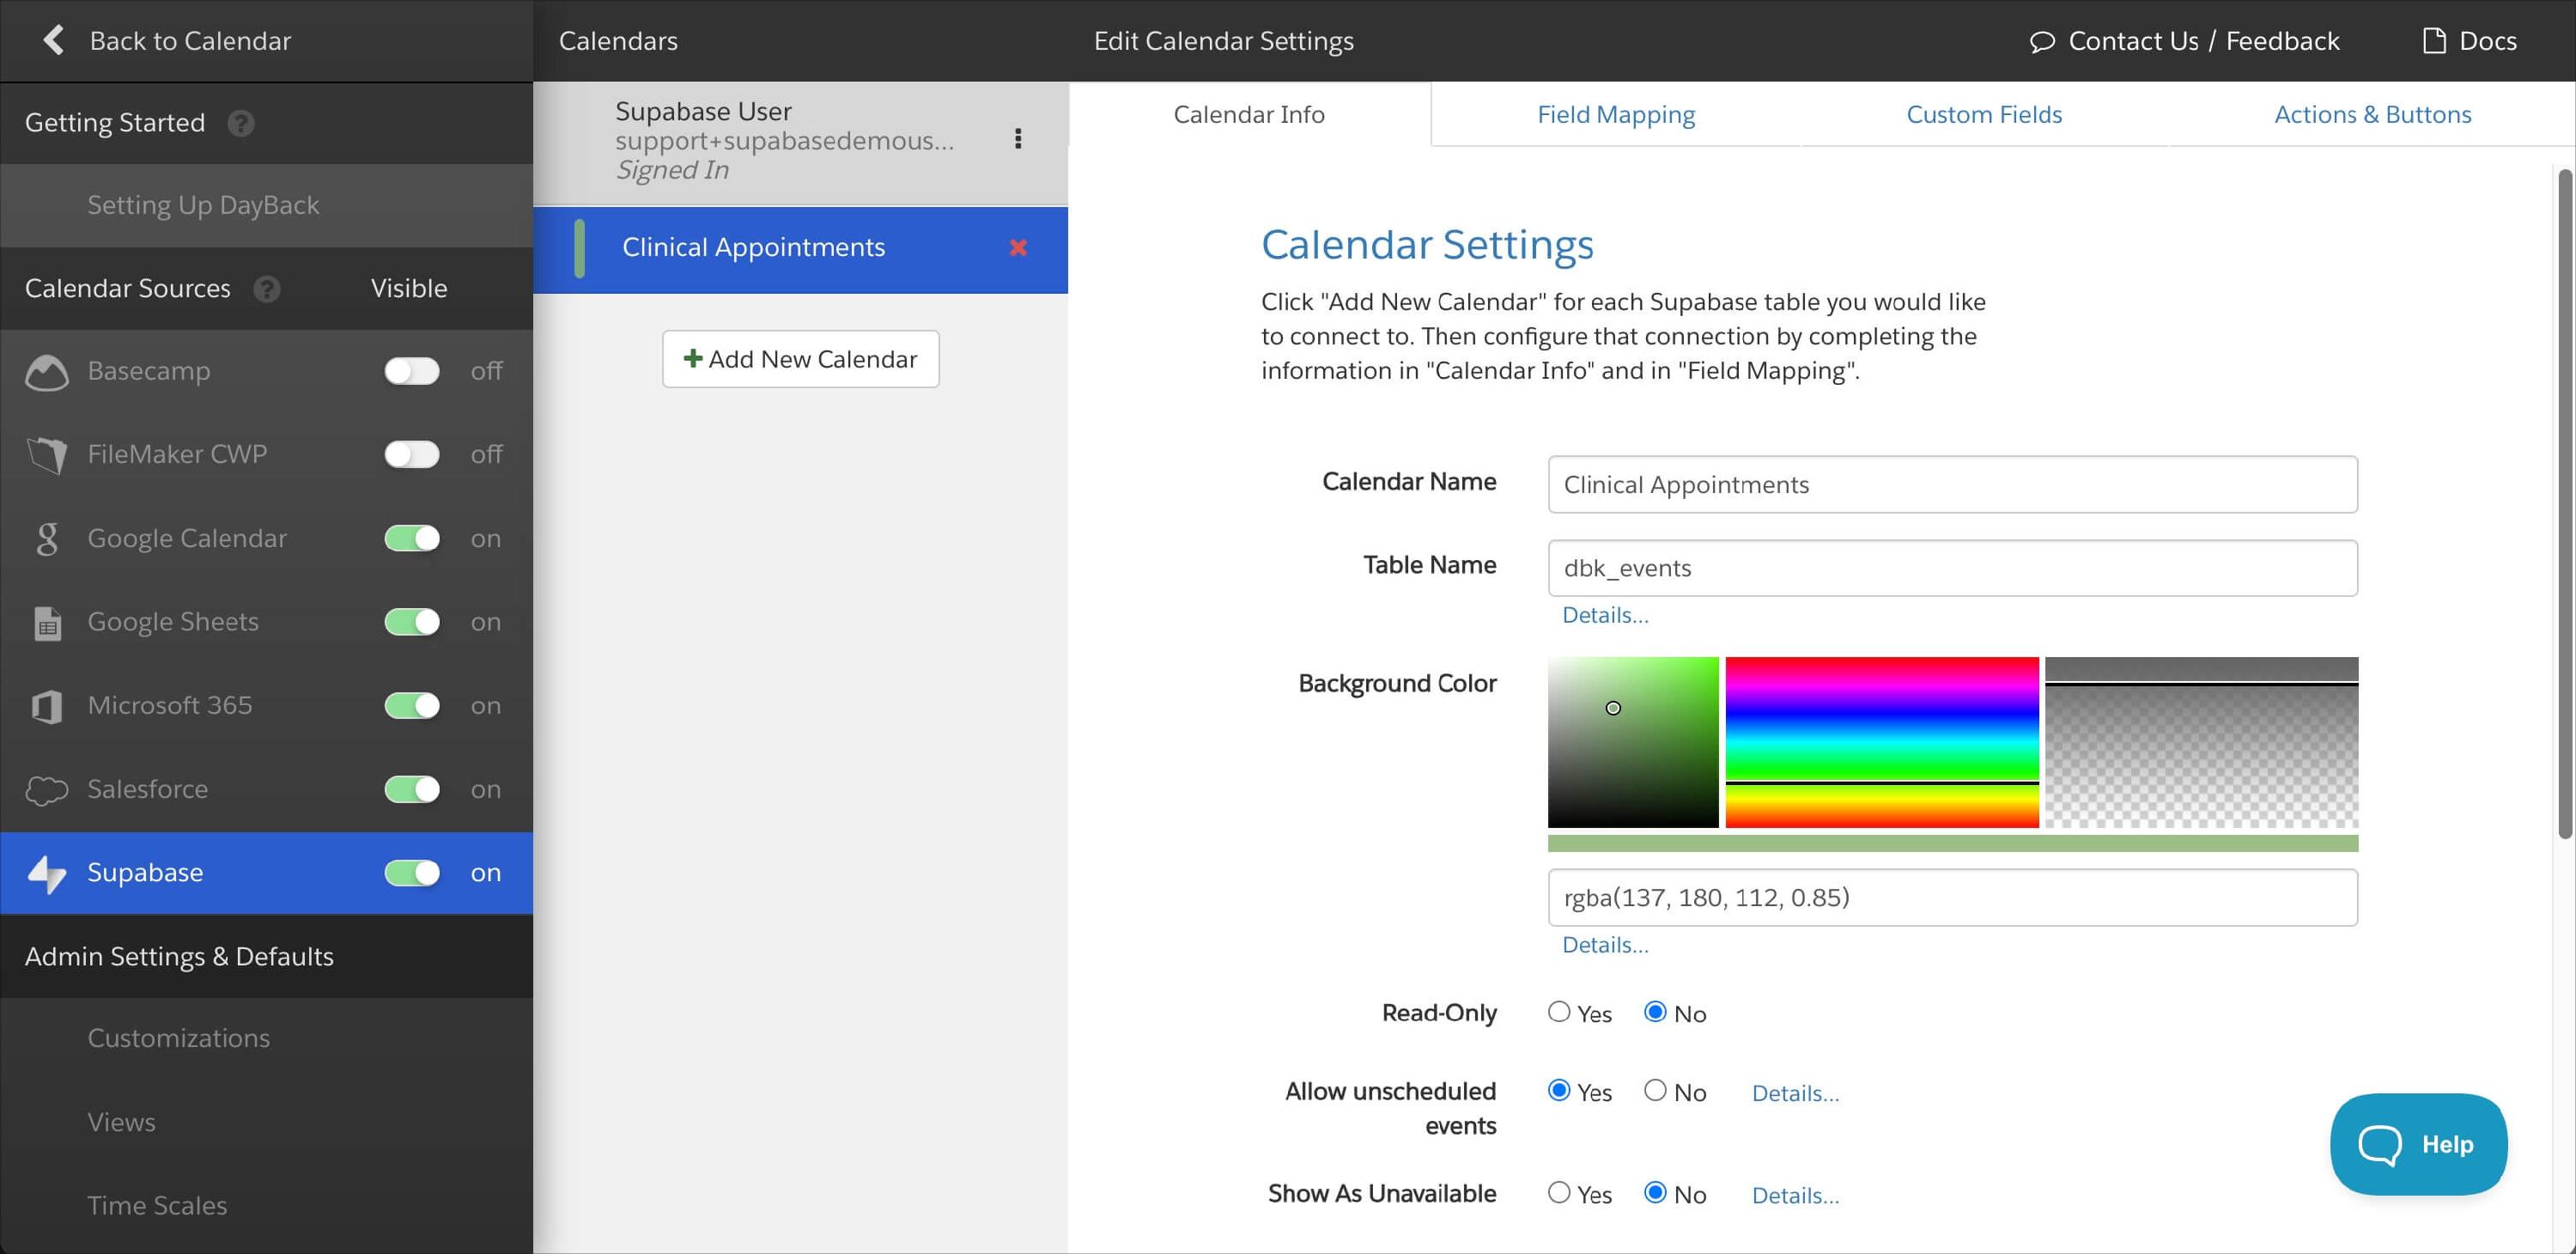
- Table Name: The table you want to get records from. This is the table name without the schema: so it's "Events" not "public.Events."
- Background color: Have fun here, though we find a slight transparency works best (a 0.85 alpha value). This will be the default color for records that don't match one of your status colors.
- Read-Only: DayBack will respect your Row Level Security policies from Supabase, but this switch gives you a quick way to make it visually evident to your users that these records can't be edited (they'll see a little lock icon, drag will be disabled, etc.). When you get into field mapping (below), you can make field-by-field decision decisions as to which fields are editable.
- Allow Unscheduled Events: Check out the unscheduled list in DayBack and turn this switch on if you'd like to drag these records to or from the unscheduled sidebar to the right of the calendar.
- Show as Unavailable: If you want this calendar to depict the times you are NOT available, read this: Availability Scheduling. Your records will show up without any title or description, just greying out the time slots they occupy.
- For Analytics Only: Sometimes you need your charts in DayBack to take advantage of records that you don't need to see in the calendar.
- For Map Only: Select this if your table represents locations instead of temporal events. For example, you'd select this option if this was a table of customer locations you wanted to see in DayBack's Map so you could determine if you had appointments near an existing customer. Appointments would be shown on the calendar AND the map. Customers would show on the "map only."
- Database Date Format: TYYY-MM-DD is the default for Supabase. This is how dates are stored in your table, not how they are displayed. DayBack will pick up your language and region and format your dates to match, though you can tweak this: date formats, time formats.
- Database Time Format: Similar to dates, this is how times are stored in your Supabase table, not how they are displayed. H:mm:ss is the default for Supabase.
- Show as Resource: More common in Google and MS365 calendars, use this if every record from this table is for the same resource. Feel free to leave this blank.
- Default Popover Drawer: The table you want to get records fro
Map Your Fields
Here you'll tell DayBack which fields should show up in the calendar and which date fields will be used to fetch your records.
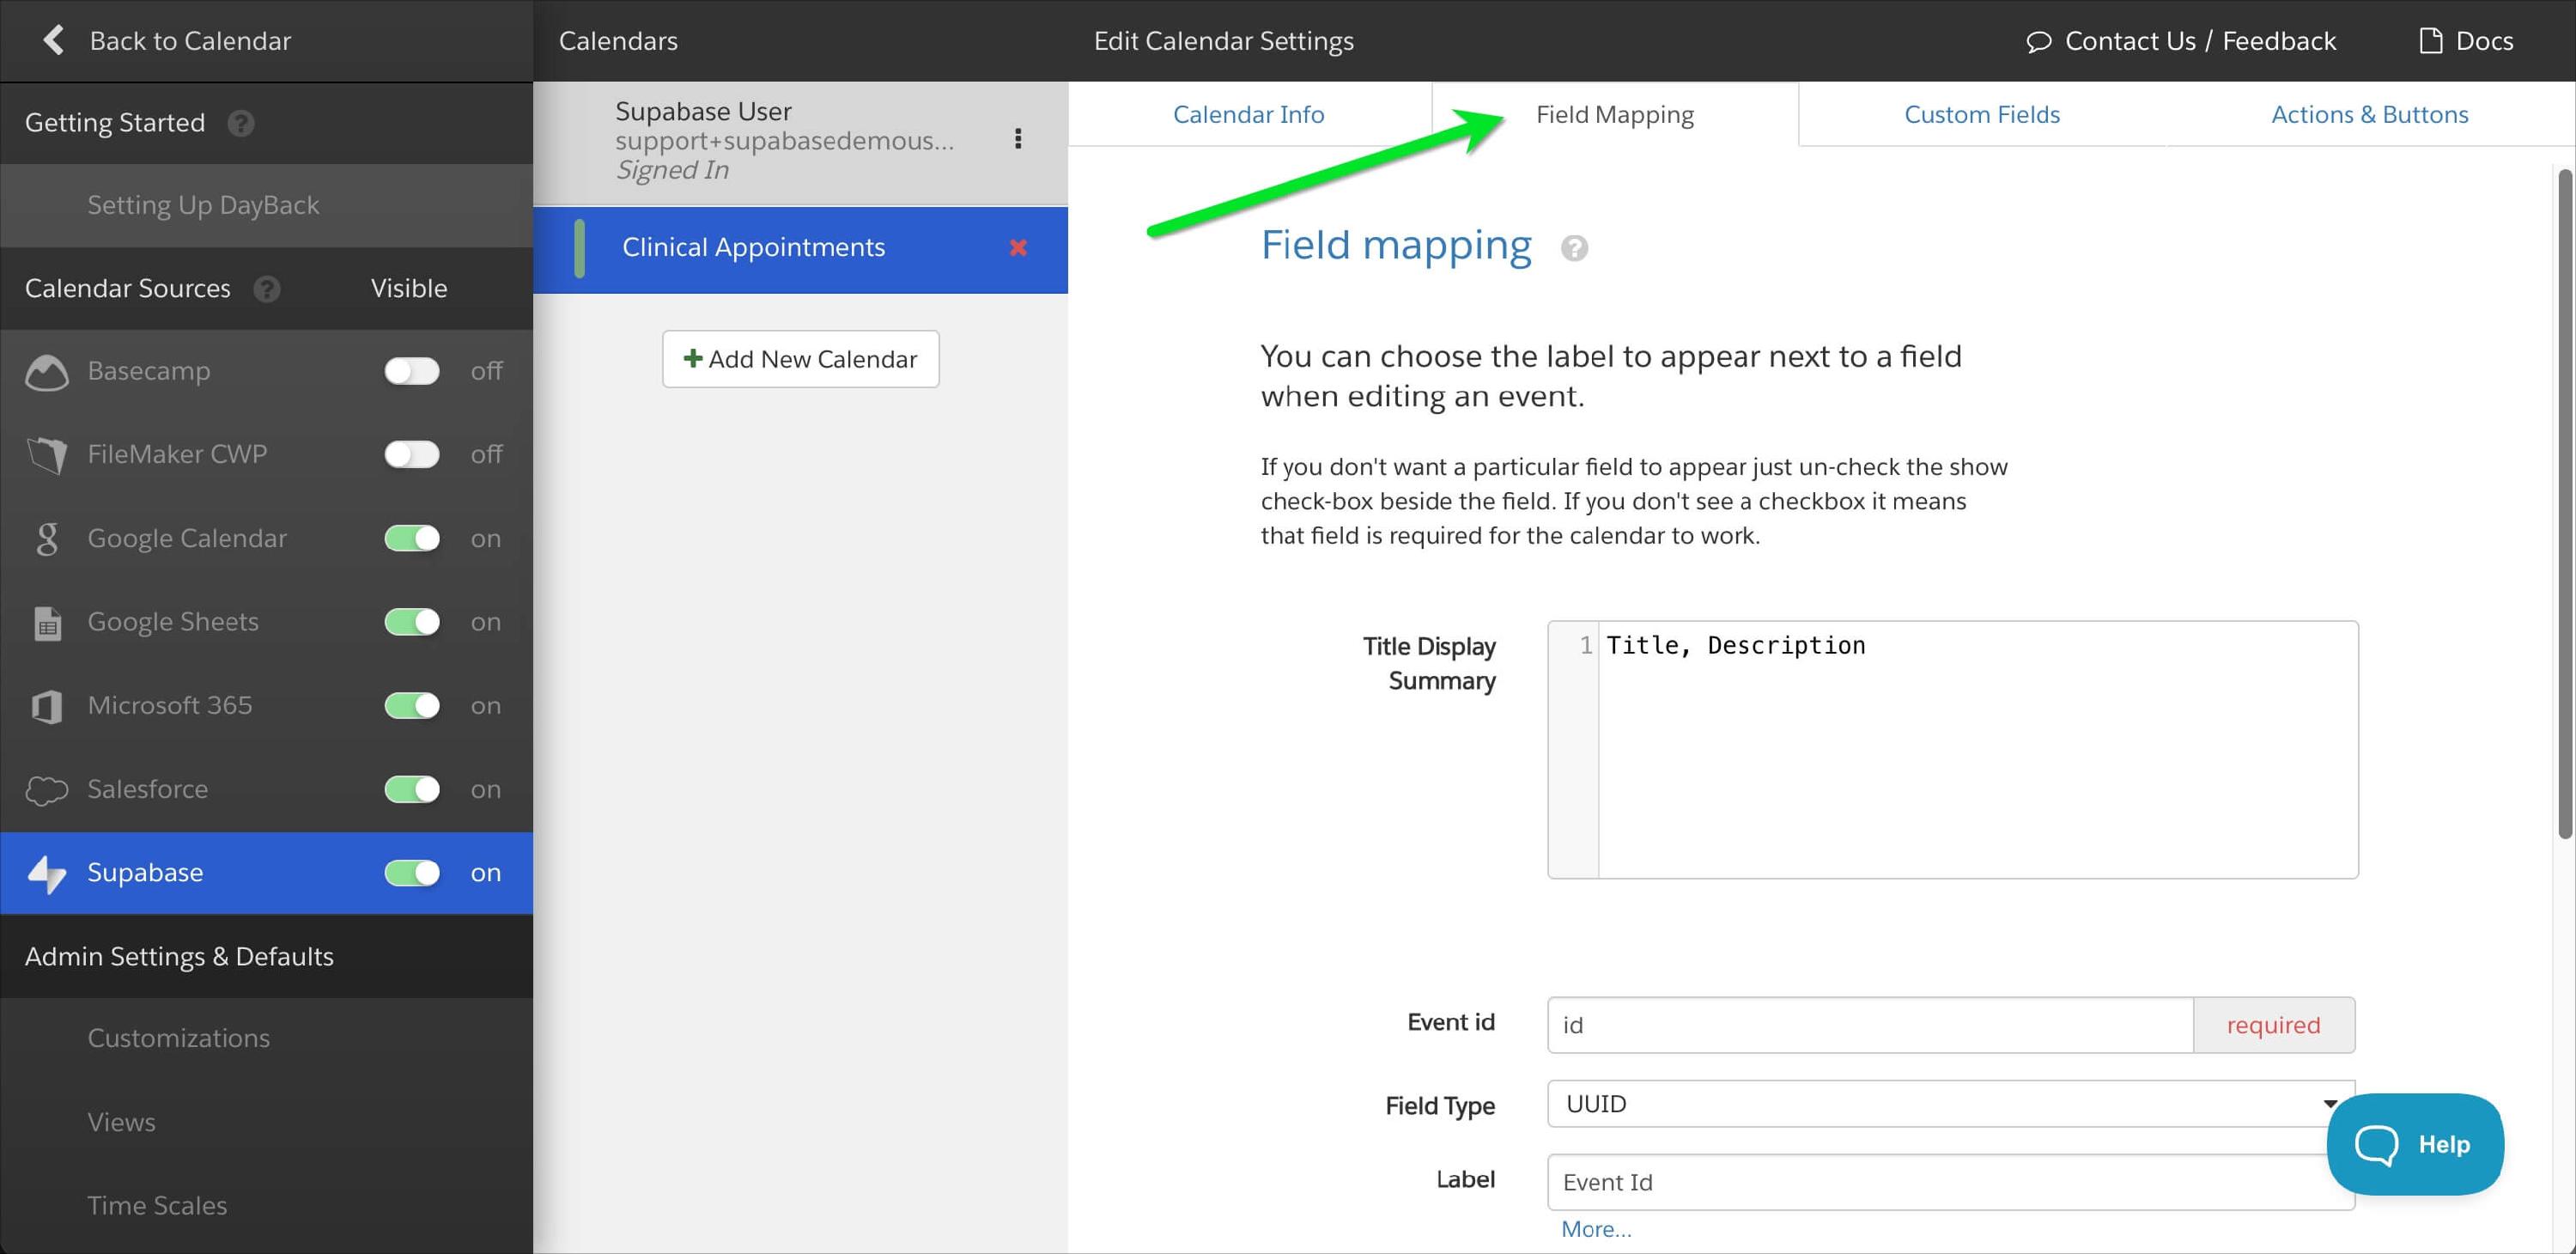
The Field Mapping tab will list the fields available in DayBack and highlight any required fields you may need to add to your table. You can disable any fields you don't need or are unsure about. Fields without an "enabled" checkbox are required for the calendar to function - an event's start time, for example:

Read-Only and Computed Fields
Click "More" beneath any field for notes, suggestions, and the "read-only" and "hidden" options. You might make a field read-only if you're mapping it to a generated column or computed field in Supabase.
Checking Your Work
When you're done mapping all the fields you want to start with, click "Validate Field Mapping" at the bottom of the page to test your work. You'll see any fields where you may have mistyped a field name. (Note that DayBack cannot check that your field types are correct, but you'll see errors when creating or editing events in the calendar if you've entered the wrong type for a field.)


Note that field names in Supabase are case sensitive.
Details on Each Field
- Display: While this is first in the list, you should come back to it later, leaving the default entry, "Title, Description" in place for now. This is the place where you'll determine how an event looks on the calendar (before you click on it) and you'll find a section of these docs dedicated to this here.
- Event id: This is the primary key in your Supabase table and you almost certainly already have one. If you are making a new table we recommend you use the UUID field type, but DayBack also supports other formats if you've set up your Supabase table differently.
- Title: The "name" of your event.
- Description: A longer text field for details of your event. You can elect to include HTML in this field, and DayBack will offer a rich text editor instead of an input field in that case. More here: Rich Text and HTML in Events.
- All-Day: This is likely a field you wouldn't have before using DayBack. This boolean field tells DayBack if your event spans a whole day. Without this field enabled, you won't be able to drag an event to the all-day section of DayBack's schedule views. But you won't need to backfill this field for existing events.
- Start: You may have many date or timestamp fields in your table: this is the one that puts the item on a specific date/time in the calendar. Choose Timestamp TZ if that is how your field is set up and you'd like to take advantage of DayBack's timezone support.
- If you want to force your items to be "all day" and not allow times to be assigned to them, select "Date" as your field type, regardless of how your field is actually configured in Supabase. If you do this, you do not need to map the all-day field above.
- You may have multiple dates you'd like to see on the calendar. For example, your calendar could be showing your projects table and you have three important dates you'd like to see: project start date, payment due, and first walkthrough. You have two options here:
- Map the same table three times, using different date fields for each calendar. So you'd have a "start date calendar," a "payment due calendar," etc. The downside here is that creating and deleting dates can feel like making new projects or (accidentally) deleting a whole project.
- A better architecture is to move these dates out of the projects table so that a project has a related table of significant dates. This is much more flexible and you can even use DayBack's ideal appointments table as your starting point.
- End: The date or time for your event. If you use a computed field for this (because you have fixed durations, for example), be sure to click "More" and mark the field read-only. Ideally, this is the same field type as your Start field.
- Location: The address of your event or the URL if the event is virtual. This is the field DayBack's map actions look for when geocoding events to show them on the map. But you can use this field without enabling maps. DayBack will still show a mini-map of the location and offer an option to open it in your default maps app.
-
Resource: "Resources" are the people or assets you're scheduling: the things in your organization that could get double booked. It's something like a room, person, truck, or business process—and it could be a combination of several of these.
When the value of this field matches the value of a resource in DayBack's resource list, you'll see that event in that resource's column or row in the calendar's resource views. Resources are one of the core concepts in DayBack. More here: Resource Scheduling.
You may have a simple field for this—like the name of the nurse who is scheduled for this appointment—or you may have already set this field up as a JSON array. If you're not sure what to do here, please get in touch; we're here to help.
- Status: This is the field DayBack uses to color code your event and we recommend you use a field that reflects a temporal state of your event with values like "pending," "confirmed," "cancelled," etc. Some folks use this field to color code their calendar by work type and that's great too. You can learn more about statuses and colors here: Event Colors and Statuses. If you need more than one color for your item, you can find some options in DayBack's extension library or consider adding colored icons.
- Geocode Latitude and Longitude. These are optional fields you should enable if you're using the map in DayBack. You can click "More" and hide these fields since users don't need to interact with them.
- Unscheduled: A boolean field indicating whether an event should show on a day in the calendar or in DayBack's unscheduled items list. This is usually hidden, so click "More" and hide it. You may also want to map this to a computed field that returns a boolean value. If you do, mark this "read-only" as well.
- Metadata: Developers can use this to pass additional information into an event without making schema changes in Supabase. This field is always hidden; that is why there is no label.
- Custom Fields Label: This isn't really a field itself: you don't need to map it to anything in subbase. It just lets you change the label DayBack uses to let users navigate to the custom fields drawer.
Custom Fields
In addition to the fields that DayBack shows on the event popover by default, you can add as many additional fields as you'd like. Instructions, tips, and tricks for these can be found here: Custom Fields in Event Popovers.
Actions & Buttons
Here is where you can add custom workflows into your calendar and change the way DayBack behaves, not just how it looks. The on-screen notes and instructions on this tab are very good and I'd suggest reviewing the articles and examples linked there to get a sense of what's possible.