
Custom Event Actions
Overview - Build the Scheduling App You Always Wanted
Event actions allow you to modify DayBack's behavior based on user interactions with events. Unlike button actions, which trigger when a user clicks a button, or app actions, which control DayBack's loading behavior, event actions are initiated by activities such as clicking, saving, or deleting an event.
All actions are open-source, and written in JavaScript. We publish our most popular actions in a searchable extensions library. Some actions are plug-and-play, while others are more complex. Our library categorizes actions as follows:
- Easy Install: These actions can be installed without customization.
- Download and Customize: These actions require some editing or configuration before use.
- Custom Integration: These actions are complex and typically require implementation by DayBack's team.
You have the same access to create and modify custom actions as we do. You can even version and test your action using Draft Mode and Snapshots so that you can extend DayBack with confidence.
By using event actions, you can tailor DayBack to better fit your workflow and enhance your overall user experience. You can also contact us anytime; we're happy to send sample code or point you to examples that may meet your specific needs.
In this article
Uses for Event Actions
Event actions are used to change DayBack's standard behaviors. For example, if you want to verify that you have sufficient travel time between two events, you can interrupt the default save behavior before DayBack saves your event.
When a save action is intercepted, you can show a dialog to the user, make additional changes to the record, or connect to some other 3rd party service to notify a customer that a change has occurred.
Another example is that you might want to prevent the rescheduling of an event if it's too close to the event's start, or you might want to jump right to your own Salesforce page or FileMaker record instead of editing an item in the default popover.
Example Salesforce action
Here's a Salesforce-specific example of how you can open up the native Salesforce record when a user clicks the event instead of opening the record in DayBack's native popover. (You'll find more examples below, and in our extension library.)

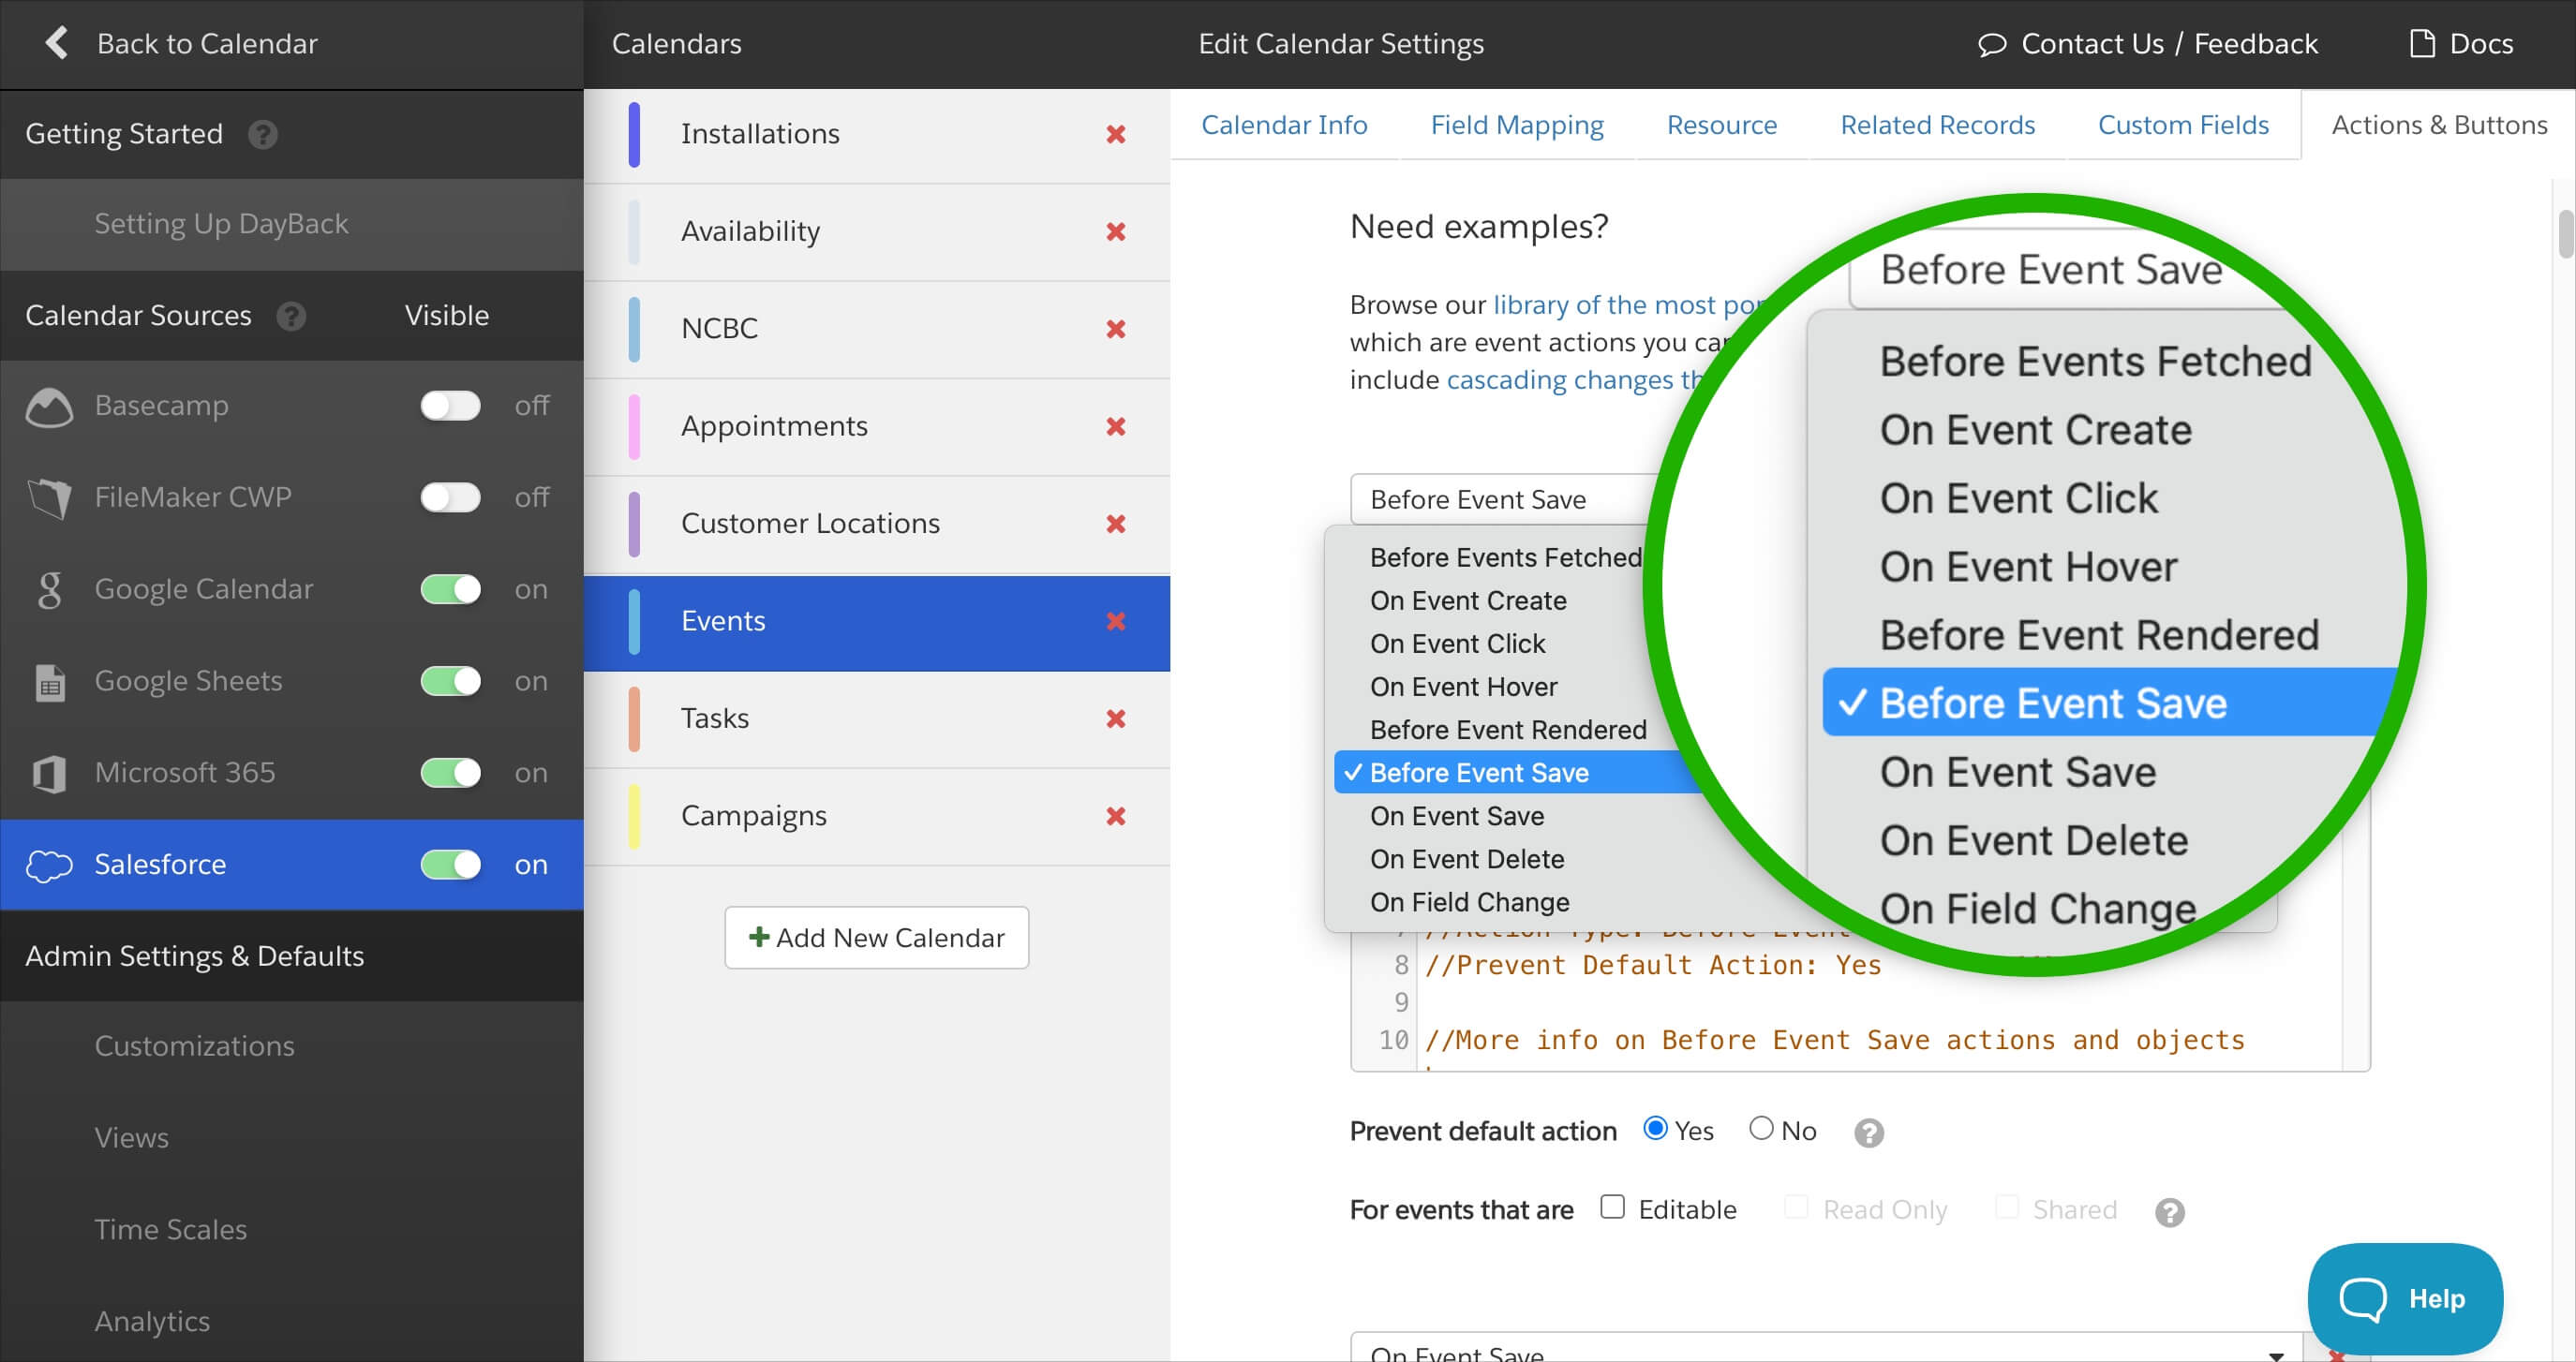
Creating an Event Action
Creating a new action is pretty easy:
- 1
- Log in to admin settings and select the source you're interested in.
- 2
- Click the Actions & Buttons tab.
- 3
- Click "Add New Event Action" and pick the trigger that should run your action.
- 4
- Paste the code you'd like to execute where it says "URL or JavaScript". This is obviously the tricky part--writing the action itself. Don't hesitate to get in touch and ask for help (Note that you can also drag JS files into the code editor in DayBack if you'd rather compose your JavaScript functions in your own editor).
- 5
- That's it.
Preventing DayBack's Default Behaviors
Each action you create in DayBack allows you to specify if the default behavior should run or not. Setting "Prevent default action" to true stops DayBack's default behavior until you decide what DayBack should do. For example, to check if a user is allowed to delete an event, set "Prevent default action" to true. Then, perform your authorization check within your action and use the following function calls based on the outcome:
action.callbacks.confirm();- Processes the request (e.g., deletes the event).action.callbacks.cancel();- Ignores the request (e.g., event is not deleted).
Available Event Triggers
On Event Create
- Actions run when a user attempts to create a new event.
- Your code executes right before the popover renders, allowing you to interrupt the process for custom actions like opening a new browser window or navigating to a Salesforce record creation page instead. Typically, you use an On Event Create action to modify the editEvent object with default values (e.g., starting status, description, or resource). You can also prevent new event creation if the user isn't authorized to add events.
- Setting "Prevent default action" to true stops DayBack from creating a new event and rendering of the event popover until confirmed in your code.
- See objects available in this context here.
On Event Click
- Actions will run whenever a user clicks on an event.
- They'll also run as soon as a new event is created, so you can also think of this trigger as an "On Popover Render" trigger.
- Setting "Prevent default action" to true prevents the popover from rendering unless this action is confirmed in your code.
- Inside these actions, you can specify a callback function to run when the popover is shown (rendered in the DOM) or hidden (removed from the DOM). Details on these functions here.
- See objects available in this context here.
On Event Hover
- Actions will run whenever a user hovers over an event, most often used for creating tooltips.
- There is no default hover behavior, so "Prevent default action" does nothing.
- See objects available in this context here.
On Field Change
- Actions will run when a value is modified for a field in the popover.
- Supported fields are Calendar, Status, Resource, Contact, and Project, along with any custom fields that you define.
- Use the params.data object for details of what changed.
- Setting "Prevent default action" to true will prevent the field from being updated in the popover unless this action is confirmed in your code.
- Fields can can also be updated within the popover using this action. See the load contact address example below.
- See objects available in this context here.
Before Events Fetched
- Actions will run before DayBack attempts to retrieve events for a particular calendar source.
- Set "Prevent default action" to true to stop DayBack from fetching events for a given calendar unless this action is confirmed in your code.
- This trigger can be used to prevent DayBack from querying for the event data so that you can trigger your own custom query to add events to the calendar:
action.callbacks.cancel();

// Fetch events with your own custom query and add
// events using dbk.addEvents(eventsArray);
On Events Fetched
- Actions will run after DayBack retrieves events for a particular calendar source, but before they are rendered.
- Set "Prevent default action" to true to stop DayBack from rendering events for a given calendar unless this action is confirmed in your code.
- This trigger can be used modify event data before it's shown.
- params.data contains the following properties:
- events array of event objects fetched after data mutations are applied.
- schedule object related to events that were fetched.
events: Array of event objects fetched after data mutations are applied.- schedule: The schedule/source configuration object for the calendar source whose events were just fetched. Use this to scope your filtering or modification logic to specific sources.
params.methodscontain the following methods:get()method when called will return the events array as it exists currently.set()method when called will set a new array of events to be rendered.
// Remove events with a "done" status
const events = params.methods.get();
params.methods.set(events.filter((event) => {
  return !event.status.includes('done');
}));
Before Event Rendered
- Actions will run after DayBack has retrieved the events but before each event is drawn on the calendar. The action runs once for every event that is about to be painted. You can use this action to transform how an event is displayed, or you can even prevent the event from displaying.
- Set "Prevent default action" to true to stop DayBack from rendering an event unless this action is confirmed in your code.
- See objects available in this context here.
Before Event Save
- Actions will run before changes made to an event are saved. This is the best trigger to use when you need to modify the event in some way before it is saved or if you wish to check whether the event should be saved in the first place.
- This trigger fires when users click "Save & Close" in the event's popover or when they complete a drag-and-drop operation in the calendar.
- Set "Prevent default action" to true to stop DayBack from continuing to save changes unless this action is confirmed in your code.
- See objects available in this context here.
On Event Save
- The action is triggered after DayBack processes the changes but just before the changes are written to the data store.
- This happens after the Before Event Save trigger and after the event changes have been processed.
- Setting "Prevent default action" to true stop DayBack from writing the changes back to the data store, but you could end your event action with code to execute the save yourself.
- This is useful for writing changes to an alternate place, such as cloning data to another data store or modifying the data before it is sent to the data store. For example, you may want to prevent DayBack from trying to write back to a formula field or calculated field.
- DayBack lets users undo their changes, and your action can test for the undo property and behave differently when edits are reverted.
- See objects available in this context here.
After Event Save
- The action is triggered after DayBack saves the changes right before the save confirmation toast is shown.
- Setting "Prevent default action" to true has no functional effect on this action trigger.
- This is useful for operations that need to happen after an event has been fully saved and exists on the calendar. For example adjusting display values or updating related events.
- params.data contains the following properties:
- isUndo boolean if the action is triggered from an undo operation.
- allowUndo boolean if the save event allows undo operations, would be false for a new event.
- fromMultiselect boolean if the save was triggered from a multiselect operation.
- originalEvent object with data representing the event prior to the save.
- params.methods contains the following methods:
- disableToast() method when called will prevent any toast validations from showing after save.
- revert() method when called will revert changes to the event if allowUndo is true.
On Event Delete
- The only way to trigger this action is via the "Delete" button inside DayBack's popover.
- Like On Event Save, setting "Prevent default action" to true will stop DayBack from writing the delete back to the data store (Google or Salesforce, for example).
- See objects available in this context here.
For the complete trigger execution order and how triggers gate each other during startup and save operations, see Action Objects & Methods.
Enabling "Prevent Default Action" affects confirmation messages
DayBack typically displays a notification banner at the bottom of the screen when an event is saved or deleted. However, the "On Event Save" and "On Event Delete" actions can affect these notifications. If "Prevent default action" is set to true, DayBack will not show the success notification since it doesn't know if your action saved or deleted the event. You can still trigger the notification in your code using the utilities.showMessage() function.
Available Fields, Functions and Objects
Your custom event actions have access to your Salesforce or FileMaker event data so long as you have mapped these fields in your data source settings. All fields can be accessed directly from the event and editEvent objects. Common functions and configuration options can also be accessed through the seedcodeCalendar , dbk , and utilities objects. Additionally, each individual trigger offers trigger-specific objects.
Learn more about accessing event attributes, additional custom fields, as well as DayBack objects and functions available for use within your event actions.
Example Event Actions
Here are some example actions to inspire your calendar customizations. Please copy and paste these into your DayBack, and don't hesitate to reach out if you get stuck. Check out our DayBack Extensions Library for a comprehensive database of all example actions.
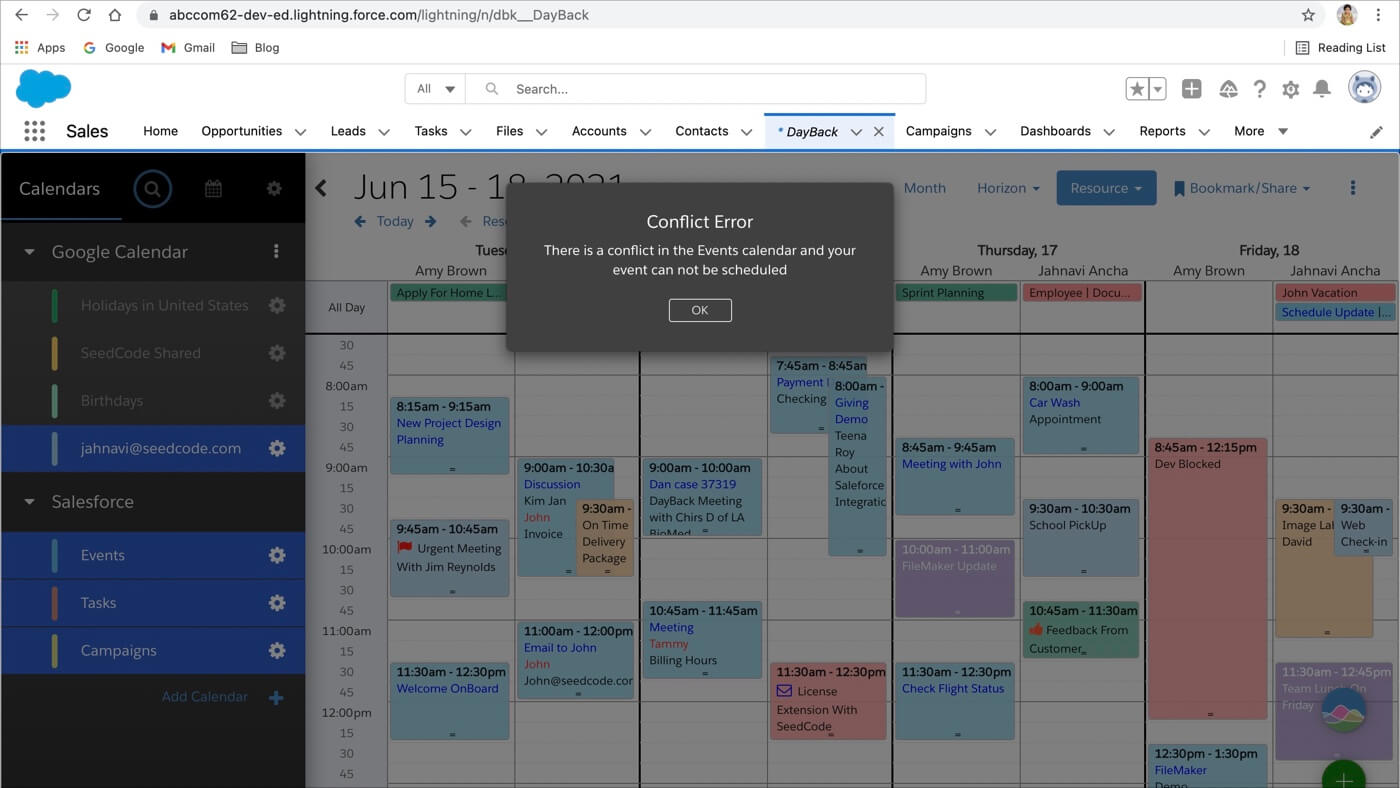
Prevent Resource Conflicts in Salesforce
| Use |
By default, DayBack allows conflicting events. What constitutes a conflict in one calendar might differ from another. Since users can make changes in DayBack or Salesforce, conflicts can arise from either. Therefore, conflict-checking must be implemented in both platforms. DayBack Action: This example action fires when events are edited in DayBack. It prevents double-booking if an existing event with the same resource and overlapping times exists in Salesforce. This example can be modified for additional conflict criteria. Salesforce Trigger / FileMaker Trigger: This DayBack example works together with the following Salesforce triggers to prevent conflicts when events are edited in DayBack or Salesforce screens. There is also a FileMaker version available.
|
| Trigger | Before Event Save |
| Script | The code, a demonstration video, and details are available here: Prevent Resource Conflicts in Salesforce. |
| Options | Open in new window: No Prevent default action: Yes |
Force Selection of a Single Resource or Status from Multi-select Lists
| Use | By default, events can belong to multiple resources and have multiple statuses simultaneously. This action ensures that an event can only be assigned to a single resource or status at one time. This is particularly useful in mobile environments where multi-select is the default behavior, but the field should only be set to a single value. |
| Trigger | On Field Change |
| Script | forceSingleSelect.js |
| Options | Open in new window: No Prevent default action: Yes |
Show only Calendar-specific Resources within the Event Popover
| Use |
DayBack allows assigning events to any of your resources, but sometimes you may want to restrict an event to a specific list of resources. This action lets you specify a narrower list of assignable resources by setting tags for your resources. Tags can describe a resource's relationship to a specific calendar. The action checks resource tags and folder names to determine applicable resources for an event. You can configure options to include or exclude entire folders of resources for a specific calendar. Here's a video explaining how this works and the tags you'll use to configure it. |
| Trigger | On Event Click |
| Script | resourceListToggle.js |
| Options | Open in new window: No Prevent default action: No |
Prevent the Opening of Event Popovers
| Use | By default, users can drag events to reschedule and click events to view and edit details. If you want users to drag events without viewing or editing details, you can disable the edit event popover. This one-line action effectively turns off DayBack's On Event Click behavior. |
| Trigger | On Event Click |
| Script | var dummy; |
| Options |
Open in new window: No Prevent default action: Yes Note that you can use this var dummy; to turn off any of the trigger actions, including turning off deletes. |
Go Directly to Salesforce Record or FileMaker Layout On Event Click
| Use |
Clicking an event in DayBack opens the native event editing popover. If you prefer to edit event details directly in Salesforce, you can use a one-liner to jump to the item's Salesforce page. Alternatively, you can keep basic editing in DayBack and add a button to go to the Salesforce record. For FileMaker, you can configure DayBack to open events in your own FileMaker layout or card window. |
| Trigger | On Event Click |
| Script | fbk.publish ( "dbk.navigate" , { "url" : "/[[Id]]" , "new" : false } ); |
| Options | Open in new window: No Prevent default action: Yes |
Change an Event's Status when a Custom Checkbox is Checked
| Use |
If you've mapped a custom checkbox field called Quick Example of how to access custom fields: // Standard way of referring to Custom Fields by
// numerical ID:
let meetingAttendedFlag = editEvent['1234996543210-4152637485'];
// More human-readable way to refer to a Custom Field
// by using the field name
let fieldName = dbk.getCustomFieldIdByName('meetingAttendedFlag', editEvent.schedule);
let meetingAttendedFlag = editEvent[fieldName]
if (meetingAttendedFlag == true) {
editEvent['status'] = ['Closed'];
}
|
| Trigger | Before Event Save |
| Script | setStatusOnCheckboxChecked.js |
| Options | Open in new window: No Prevent default action: No |
Prevent Drag and Drop from Changing an Event's Time
| Use | All events can be dragged and dropped to a new resource, calendar, status, or time. If users need to reassign resources by dragging and dropping without changing the event's time, use the Before Event Save trigger. This trigger lets you access an event's state before and after the drag-and-drop action, detecting changes. The following action snaps an event back to its original time if the drag-and-drop results in a time change. |
| Trigger | Before Event Save |
| Script |
noTimeChange();
function noTimeChange() {
   // drag and drop or popover edit?
   if(event.beforeDrop) {
      if(event.allDay!==event.beforeDrop.allDay || !event.start.isSame(event.beforeDrop.start) || !event.end.isSame(event.beforeDrop.end)) {
        event.allDay = event.beforeDrop.allDay;
        event.start = event.beforeDrop.start.clone();
        event.end = event.beforeDrop.end.clone();
      }
   }
}
|
| Options | Open in new window: No Prevent default action: No |
Create Calendar-specific Default Event Duration
| Use |
DayBack has a setting for an app-wide default event duration. To change the default duration for specific calendars, use the following action. Since event actions can be unique for each calendar, you can copy and paste the code into each calendar's On Event Create action and set your default duration. For different default durations for each resource or other resource-specific defaults, refer to our blog post on setting up default values for each resource. |
| Trigger | On Event Create |
| Script |
// Default duration is 30 min by setting the end // time to be 30 minutes after the start time editEvent.end = moment(editEvent.start).add(30, 'm'); |
| Options | Open in new window: No Prevent default action: No |
Prevent Drag and Drop for Specific Calendars
| Use |
By default, DayBack allows rescheduling events using drag and drop. To prevent dragging and dropping in a specific calendar, use the following action. This action cancels the save event if it finds a This ensures that events can only be rescheduled through other means, not by dragging and dropping. |
| Trigger | On Event Save |
| Script |
// Revert changes if the event was dragged and dropped
// otherwise, allow the Save to take place

if (event.beforeDrop) {
  action.callbacks.cancel();
} else{
  action.callbacks.confirm();
}
|
| Options | Open in new window: No Prevent default action: Yes |
Retrieve Custom URL Parameters for use in your Event Actions
Retrieve custom parameter from URL
| Use |
DayBack can be loaded with special URL parameters to control its initial behavior. To pass custom URL parameters for use in event actions, use this app action to scan the URL for parameters. This is useful when loading DayBack in a FileMaker WebViewer, allowing parameter usage when creating or editing events. For example, the following action retrieves the |
| Trigger | On Event Click |
| Script |
// Gets the sessionID parameter from the URL
// and stores it in a custom field

getSessionID();

function getSessionID() {
  var sessionID = getUrlVars().sessionID;
  editEvent['1234996543210-4152637485'] = sessionID;
}

// This function retrieves all parameters from the URL
// and returns them as an object of key=value pairs

function getUrlVars() {
    var vars = {};
    var parts = location.href.substring(0, location.href.indexOf('#/')).replace(/[?&]+([^=&]+)=([^&]*)/gi, function(m,key,value) {
        vars[key] = value;
    });
    return vars;
}
|
| Options |
Open in new window: No Prevent default action: No Note: A few example DayBack URLs that could be used in with this custom action: |
Prevent Changes to Events in the Past
| Use |
By default, DayBack allows changes to historical events. To prevent this, you can make past events read-only using two app actions:
These actions ensure that historical information remains unchanged while still providing visibility into past events. |
| Trigger | On Event Click |
| Script | readOnlyPastOnClick.js |
| Options | Open in new window: No Prevent default action: No |
| Trigger | Before Event Save |
| Script | readOnlyPastBeforeSave.js |
| Options | Open in new window: No Prevent default action: Yes |
Send Email when an Event is set to a certain Status
| Use |
DayBack can send notification emails directly from Salesforce or your FileMaker server. For Google Calendar users, notifications are managed by Google settings. While DayBack doesn't communicate with email servers directly, you can use a simple action to compose an email using your computer's default email client. For example, if you want to notify someone when an event's status is set to "On Hold," this action will automatically compose an email with the event's details, including the title, description, time, and a link to the event in DayBack. |
| Trigger | On Event Save |
| Script | emailSupportOnHold.js |
| Options | Open in new window: No Prevent default action: No |
Set a Default Event Contact for Salesforce Events
| Use | Salesforce has sharing rules that restrict visibility of events and tasks to their owners. To overcome this, you can set up a parent customer record and grant users permission to view records associated with this parent account. This custom event action will automatically assign a Parent Customer Record ID to all newly created events. This is one way to allow individuals to see each other’s events and tasks in Salesforce. |
| Trigger | On Event Create |
| Script | setEventParentContactID.js |
| Options | Open in new window: No Prevent default action: Yes |
Load Contact's Address as the Event's Location for Salesforce Events
| Use | Salesforce stores address information in an event's related contact record. This app action detects if a user changes the contact associated with an event and uses a SOQL query to load the contact's address into the event location field. This demonstrates how to react to user changes and interact with Salesforce records from within the event popover. |
| Trigger | On Field Change |
| Script | loadContactAddress.js |
| Options | Open in new window: No Prevent default action: Yes |
Disable all-day events
| Use | If you want to prevent all-day events from being created, this action converts all-day events into scheduled events. It sets the event to the current time slot with the default event duration specified in your DayBack settings. |
| Trigger | On Event Create |
| Script | disableAllDayEvents.js |
| Options | Open in new window: No Prevent default action: No |
Set the Default Resource for New Events to the Logged-in User
| Use |
By default, newly created events are unassigned. This action automatically assigns new events to the currently logged-in user. Since events can be assigned multiple statuses and resources, these values must be defined as arrays. For example: Read more about the information available through the seedcodeCalendar object. This method can help set default information for events. Since you have access to the current user and the calendar, you can make decisions about other defaults you may want to set. Consider starting all your events in the 'New' status, as in the example below: |
| Trigger | On Event Create |
| Script |
// Add the creator as a resource to new events

editEvent.resource = [seedcodeCalendar.get('config').accountName];

// Set events to start off in New status

editEvent.status = ['New'];
|
| Options | Open in new window: No Prevent default action: No |
Define Event Dependencies and Update Related Events
| Use |
For projects with multiple related events, you may want to create a linking relationship so that changes to any activity automatically cascade through the timeline, reflecting in all downstream activities. This type of relationship is called a cascading event. This action has several configuration options, detailed in our blog post on cascading events. |
| Trigger | On Event Save |
| Script | cascadingEvents.js |
| Options | Open in new window: No Prevent default action: Yes |
Confirm Appointments or Collect Information in a Custom Form
| Use |
DayBack allows importing any third-party JavaScript library, enabling extensive customization. This example uses the Wufoo form library to create a public booking request form in a publicly-shared calendar. Public shares can display specific views to the general public via a direct link. This example overrides the On Event Click trigger for events in a public share. For instance, when a potential customer clicks an event in your public calendar, DayBack can display a custom form, collect the customer's information, and email both you and the customer. The Wufoo form library offers features like form validation and emailing. Here's a short video of this in action. |
| Trigger | On Click |
| Script | confirmAppointmentWuFooForm.js |
| Options | Open in new window: No Prevent default action: Yes |
Validate Data Entry and Ensure All Fields are Filled In
| Use |
DayBack doesn't perform specific data validation when users create or edit events, but you can easily add basic or advanced validation. This custom action specifies fields that must be filled before saving an event. If a required field is empty, a notice pops up, giving the user the option to continue editing to fill in all required fields or save with some fields empty. Here's a video demonstrating this action in use. |
| Trigger | Before Event Save |
| Script | validateFieldEntry.js |
| Options | Open in new window: No Prevent default action: Yes |
Check a Resource's Capacity and Prevent Overbooking
| Use |
To prevent over-scheduling certain resources, you can set up scheduling limits. This action stops an event from being saved if it causes a resource to exceed its daily event limit. Using a SOQL query to check Salesforce records directly ensures access to the full schedule, not just the user's current view. If the change would overbook a resource, it prompts the user with an error message showing the over-capacity days and cancels the edit. This action demonstrates how to scan calendar events and make decisions based on the upcoming schedule. |
| Trigger | Before Event Save |
| Script | checkResourceCapacity.js |
| Options | Open in new window: No Prevent default action: Yes |
Warn a User if they are Creating Events in the Past
| Use | Mistakes happen, and sometimes events are accidentally scheduled in the past. This simple action prompts the user with a warning when creating an event in the past. The user can then choose to cancel or continue with the event creation. |
| Trigger | On Event Create |
| Script | inThePastWarning.js |
| Options | Open in new window: No Prevent default action: Yes |
Looking up a Resource ID by name (Salesforce)
| Use | Salesforce stores an event's resources as a list of numerical IDs. When you change a resource on an event, DayBack needs to look up the numerical ID before saving the change back to Salesforce. Previously, this required an app action, but now you can map related resources directly within the Admin settings. |
Pre-filter Salesforce Events and Override Start Field when Editing (Salesforce)
| Use |
By default, DayBack displays all events in your mapped Salesforce objects. To filter events, set up a calculation to determine which events to include. Map your calendar's start date to a formula field instead of the event's real start date. Part 1 - Set Up Your Formula Field Create a formula field in your Activity object that returns an empty date for excluded events and the real start date for included ones. Example: This example returns the event's start date and time but only for events belonging to the current user.
Here's an article that describes how to pre-filter events in Salesforce using this method. Part 2 - Specify the Real Start Date Field Since pre-filtering uses a calculation, DayBack can't update this field directly when scheduling changes are made within DayBack. Instead, you must add a Salesforce-specific event action to specify the actual |
| Trigger | On Event Save |
| Script | overrideStartEdit.js |
| Options | Open in new window: No Prevent default action: No |
Merge information to/from Google Calendar (Salesforce)
| Use |
Here are two ways you can integrate Salesforce with Google Calendar:
|
| Trigger | Multiple |
| Script | Two examples here: Google Calendar Actions in Salesforce |
| Options | Open in new window: Multiple Prevent default action: Multiple |
Push Events to Google Calendar
| Use |
DayBack can push events from other calendars to Google Calendar, useful for integrating with third-party applications that interact with Google Calendar but not directly with Salesforce or DayBack. For example, if you're using Calendly to allow customs to schedule appointments with you directly, you can block your appointment availability by cloning your schedule into a Google Calendar that Calendly checks to prevent double booking. While this action doesn't sync with Google (changes in Google aren't brought back to other calendars), it's effective for building a Google Calendar from specific Salesforce, FileMaker, or other Google Calendar events. |
| Trigger | Multiple |
| Script | Find a description and download code for the two required actions here: DayBack and Calendly |
| Options | Open in new window: No Prevent default action: Yes |
Change behaviors when special keys are pressed
| Use | Keyboard shortcuts make everything easier. This pair of actions enables DayBack to listen for specific keys and lets you test for them in your custom actions. For instance, you can change the behavior of clicking an event if the "z" key is held down. DayBack already listens for shift and option keys, and the command key is reserved by the browser, so it's recommended to use "regular" keys for custom actions. |
| Trigger | Multiple |
| Script | The two actions are available here: KeyDown Listener |
| Options | Open in new window: No Prevent default action: Probably |
Remove attendees from events when duplicating (Google Calendar)
| Use |
When you drag-duplicate an event with attendees (for Google and O365), you may want to avoid copying attendees to the new event or reset their "accepted" status. This action removes the attendee object entirely. You could also unset just the event acceptance by examining the properties of the Remember, app actions can be defined for all calendars or an individual calendar. Apply this action to the origin calendar, as the On Event Create fires immediately after duplication while the event is still in the original calendar. |
| Trigger | On Event Create |
| Script | event.attendees = []; |
| Options | Open in new window: No Prevent default action: No |
Set Default Event Duration for each Resource
| Use |
By default, all your resources share the same default values, such as event duration. This app action lets you set specific default durations—or any value—for each resource. While backend triggers or formula fields can set defaults, they don't apply until the event is committed to the backend. This action adds defaults immediately as users start creating the event.
|
| Trigger | On Event Create |
| Script | See a video of this in action and copy the code you'll want for your own version here: Default Durations for each Resource |
| Options | Open in new window: No Prevent default action: Yes |

Require Tags/Skills for an Event
| Use |
Resource Tags are a powerful way to define skills or attributes for your resources, useful when creating events requiring specific skills. This action checks an event's custom fields for a list of required skills. If a user tries to assign a resource lacking the necessary skills, they receive a warning message. Required tags/skills must be specified as a comma-separated list in a custom field. Configure this action to check this field against your resource's tags.
|
| Trigger | Before Event Save |
| Script | You can see this action at work towards the end of the video introducing resource tags. You'll find the code for his action here: eventRequiresTags.js |
| Options | Open in new window: No Prevent default action: Yes |

Specify a default popover drawer at the root calendar level
| Use | The available Google and Microsoft 365 calendars are unique to each authenticated user. DayBack currently supports setting a default popover drawer at the individual calendar level. This action allows you to specify the default popover drawer at the root calendar level, making it effective for all Google or Microsoft 365 calendars for everyone. |
| Trigger | On Event Click |
| Script | DefaultPopoverDrawerRootLevel.js |
| Options | Open in new window: No Prevent default action: No |
Coding Your Own Actions
We recommend using our App Action Starter Template to create custom actions. The template offers graceful error handling and features for running actions for specific users. If using our template, use confirmCallback() or cancelCallback() instead of action.callbacks.confirm() andaction.callbacks.cancel() to leverage the template's timeout handling features should your app action take too long to run. Most of our examples use this template, allowing you to learn by modifying sample code.
Our starter template uses an IIFE (Immediately Invoked Function Expression) pattern with a run() function that contains all your runtime logic, and a configuration block at the top for options.* and inputs.* declarations. Helper functions should be defined inside run() . The template wrapper below run() handles timeout detection, error reporting, and account restriction — do not modify it.
Coding Recommendations
Using a Code Editor
We recommend using a code editor like Visual Studio Code for editing your actions. This allows you to keep a backup of your code.
Keep Two Tabs Open
Additionally, keep two tabs open: one for your Administrative settings to work on JavaScript code, and another for the calendar to test your changes. If you make a mistake, switch back to the first tab and press Ctrl-Z to undo the last change.
Troubleshooting Custom Actions
If your app action prevents DayBack from loading, you will see a continual blue loading stripe at the top of the screen. To disable a broken action:
- Click your browser's reload button
- Quickly hold down the shift key and wiggle your mouse around
- This will return you to the administrative settings so that you can disable and fix the broken app action
If you run into trouble with your actions you may wish to check your javascript console for any errors. If the cause of the problem isn't obvious to you, please take a screenshot of what appears in the console and send it to our support team. We'd be glad to help you resolve the problem.
More Resources for Custom Actions
Learning Resources
- Data Tokens, Event Attributes, and Functions: Gain a deeper understanding of the available data tokens, event attributes, and functions for your custom actions by visiting the APIs: Resources for Custom and Event Actions.
- JavaScript Objects and Methods: Explore the JavaScript objects and methods you can utilize in your custom actions at Objects and Methods for Custom Actions.
Sandbox for Testing
Custom actions provide an excellent environment for experimenting with new code and testing queries. For example, check out how DayBack's Jason Young uses custom actions to console log query results in Testing SOQL Queries in DayBack Calendar.
Please also refer to our Salesforce Client JavaScript library, which provides built-in support for running SOQL queries and making REST endpoint calls directly from your custom actions.
Draft Mode
For testing App Actions or Event Actions, we recommend using Draft Mode. This mode allows you to make custom changes what are only active for your user session. This mode is great for testing code changes without affecting other users. Drafts and be saved, disabled, reenabled, and then applied to production when your code changes are ready for production user.